
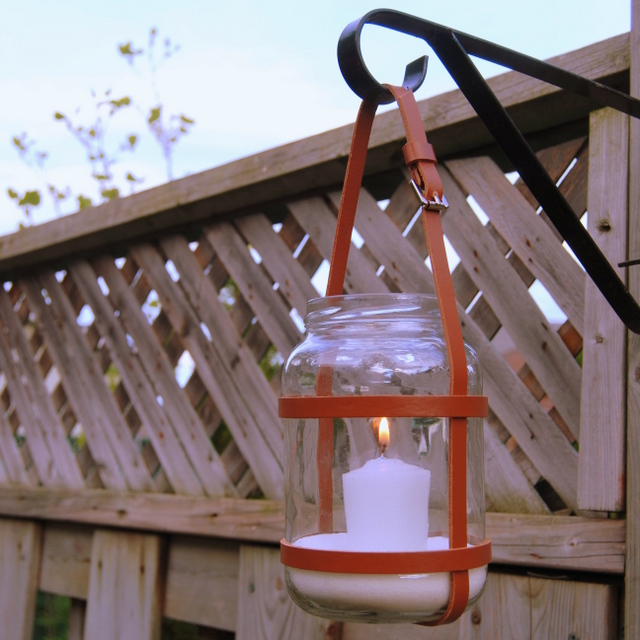
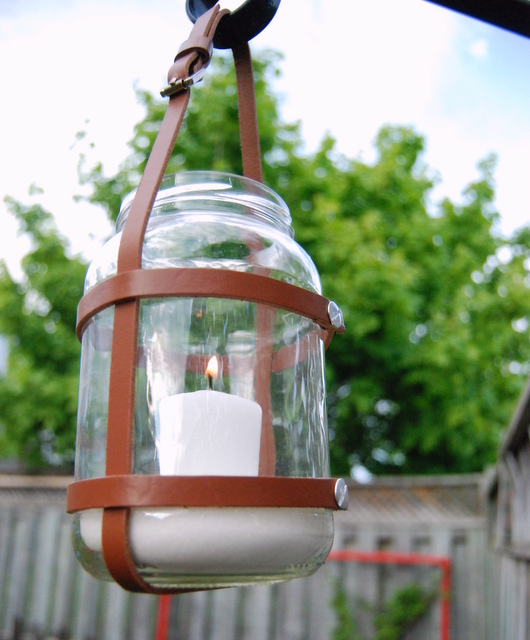
It’s the return of the, oh wait, no way, you’re kidding. She didn’t just say what I think she did, did she. Yeah sorry, now the song is stuck in your head too. Ok where was I. Right. DIY Upcycled Leather Lantern.
Yes it’s the return of the pickle jar, for pickle jar craft # 2 of the summer. It’s still Spring. Though you could have fooled me. We went from -10 to +24 degrees (that’s Celsius) and literally traded in the winter boots for flip flops overnight.
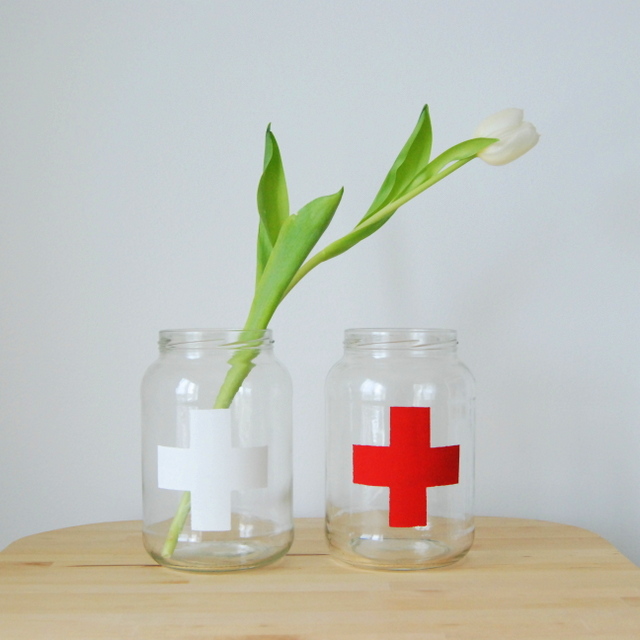
Pickle jar craft # 1 by the way, was this Upcycled Jar Vase.
DIY – Upcycled Leather Lantern
I am determined to find as many uses for pickle jars as I can. Don’t even ask.
This one started when I found some leather belts on sale at Joe Fresh.
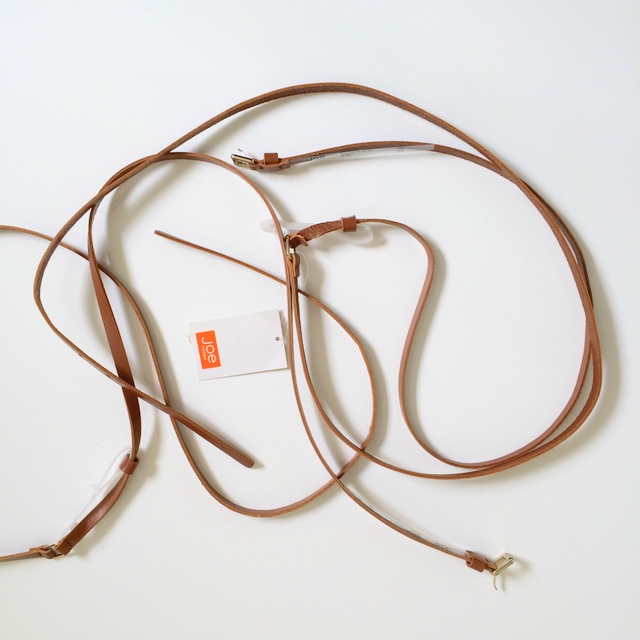
And the way my brain works is that I don’t see a belt. I see a home decor project.
STEP 1
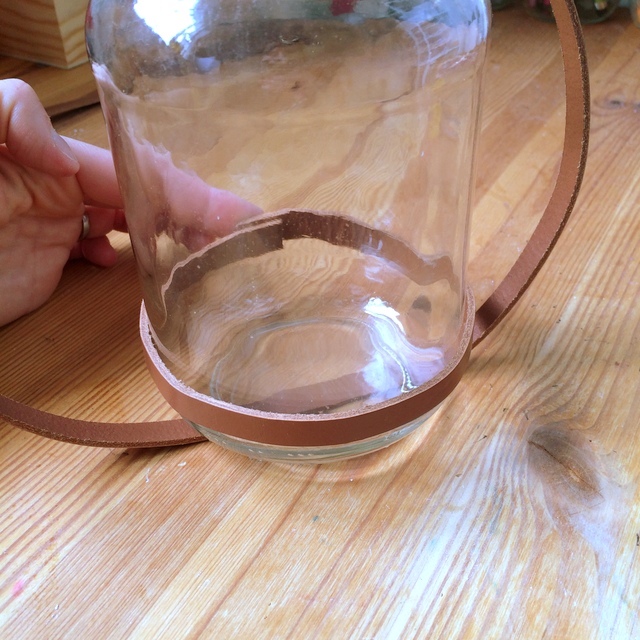
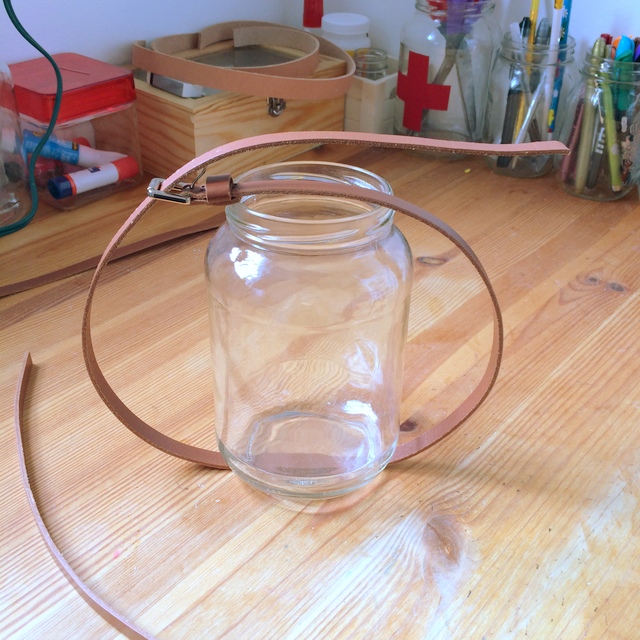
So you get yourself a pickle jar. Or any jar of your choice. Oh look there’s my pickle jar vase masking as a scissor holder in the background (Craft #3 perhaps?)
Measure the amount of your belt you’ll need vertically around your jar and trim to size.
Do the same thing for around it. And do this twice (you’ll need two pieces, one for the bottom and one for the top).
Make sure it is VERY snug.
STEP 2
Next up, have you met my new best friends?
They’re called Binding Posts (also called Chicago Screws because apparently one name wasn’t enough) and I am convinced I am the only person alive who did not know these existed.
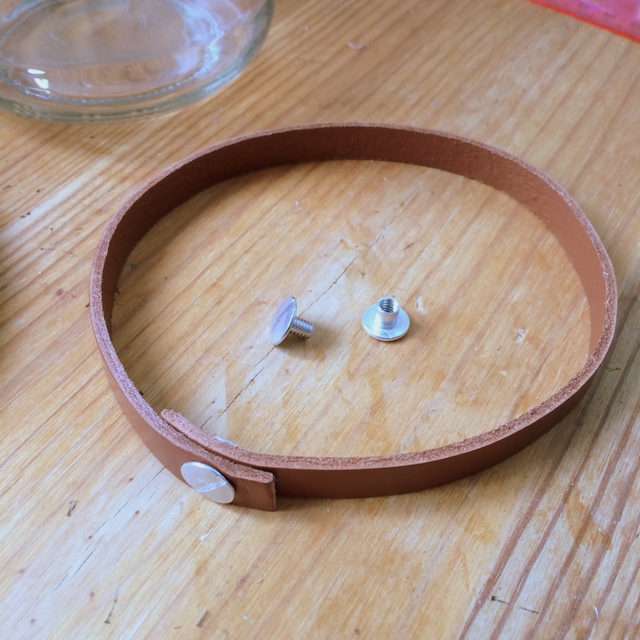
DIY project changing. Love them. You can get them at any major home renovation store or online. I foresee many projects in my future using these.
TIP – if you can’t get binding screws, you can totally use metal rivets for this too.
If I was to redo this, I probably would have just gone with rivets.
So get a drill or a hammer and a nail (or my personal fav punch tool an awl).
Then drill or hammer the nail through your leather belt over a wooden cutting board using a drill bit or a nail the same size as your binding screw post diameter.
Because you’ll need the binding post (Chicago screw) to go through the entire hole. Tighten it really well with a screwdriver.
STEP 3
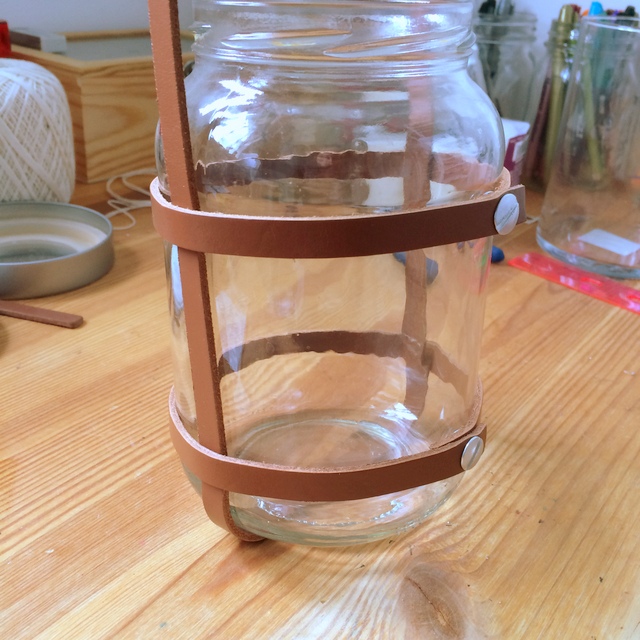
Place your vertical belt piece over your jar first.
Then place (read: pry) your other pieces over that one. It will be a super tight fit. That’s a good thing. You don’t want the lantern to fall down.
If you are extra cautious you can do one of several things:
1) Add two extra binding posts to attach the vertical belt part and the horizontal ones to create a “basket” of sorts for the jar.
2) Use E6000 glue and glue parts of the belt onto the jar itself. E6000 glue let’s me make things like this and the impossible possible.
3) Sew the vertical and horizontal straps together at the sides. And by sew I mean do a cross stitch style X vs trying to pry a needle through the leather straps unless you have a sewing machine and the patience of a saint. I do not.
I made the horizontal belt straps really tight and when I tried to pry off the leather handle it was impossible for me to do so. But maybe you’re stronger than me and can rip leather like the Hulk.
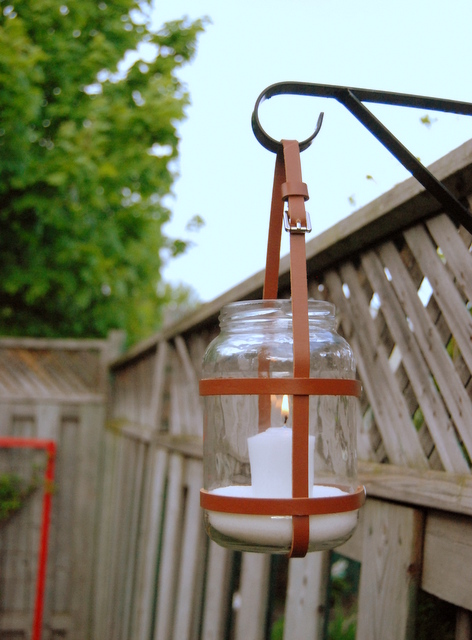
So please test this out if you plan to hang it like I did.
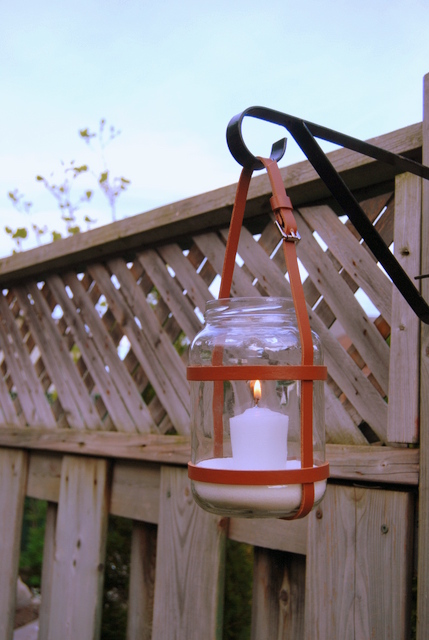
And for the love of all that is good, as with anything to do with fire or candles, don’t leave burning candles unattended!!
Then wait several days for a decent sunset to take photos of it. And you have yourself a fancy Upcycled Leather Lantern that looks far more expensive than it really is.
Because it’s not like Photoshop could have helped you out or anything.
And if you’re still like, “What song is she talking about at the begining of this post?”, you’re probably hanging out on TikTok.
28 Comments
Tash @ The Dreamhouse Project
May 24, 2014 at 6:39 pmI love this!! You seriously amaze me with your ability to take everyday items & turn them into fantastic project pieces. If everyone’s brain worked like yours did then there’d be a serious number of high end decor stores out of business!
Alex
May 24, 2014 at 6:41 pmI think I’m going to get you to write all my comments from now on Tash!!
Tash @ The Dreamhouse Project
May 24, 2014 at 6:53 pmHaha! I’d be happy to. 😉
Nicki Traikos
May 25, 2014 at 10:06 amWhat a fabulous DIY Alex!!! I love it and suspect that as it weathers, it will look even more fab.
Alex
May 26, 2014 at 9:06 amThanks so much Nicki!!
Dannyelle @ www.lifeisaparty.ca
May 25, 2014 at 7:47 pmI love this project and those screw things are new to me too, and look very handy.
Alex
May 26, 2014 at 9:10 amI can’t believe I didn’t discover them earlier. They are fantastic! Now I just need to find a place that sells them in bulk b/c they’re .99 cent per pair.
Lauren @ The Thinking Closet
May 26, 2014 at 12:21 amLove that you thought outside the box to repurpose a leather belt in this way. Now I can’t imagine it as anything BUT a lantern holder. Homerun!
Alex
May 26, 2014 at 9:12 amComing from you that’s a high compliment. One day I will get a Silhouette so that I can join your t-shirt making world!
Tara
May 26, 2014 at 3:04 amFantastic Alex! I didn’t know that those were called Chicago screws! Are they also called rivets? Or am I thinking of something else??
Either or, you’ve inspired me to look for leather belts to add to decor. Great DIY!
Alex
May 26, 2014 at 9:15 amI came across them looking for screws for a different project and in one store they’re called Chicago screws and in the other they’re called Binding Posts. But they’re essentially the same thing. You can get them in different measurements to suit whatever size you need them to go through. It’s so great for the times where you need a very flat end on the other side. I am using them in 2 more projects as is.
Alex C. (@HydrangeaGirI)
May 26, 2014 at 4:59 amThis. Is awesome, Alex! I only wish I had a garden or balcony to hang these babes off of.
Top drawer DIY.
xx A
Alex
May 26, 2014 at 9:17 amMake a sitting one! Just attach something to the base of the jar and then screw the straps into that vs them going all the way around. Come on you’re talented, you know you can rock this, maybe with a skull? Ooh we should do that…
Victoria • Restoring our Victorian
May 26, 2014 at 8:32 amBAH! you win an award for the greatest use of an EMINEM quote EVER.
I’ll just be over here… Circling the parking lot… Screaming —–
Alex
May 26, 2014 at 9:18 amIt was on the radio the week I wrote this and I just could not get it out of my head. I was like how old was I when this came out again?
kim @ DESIGN + LIFE + KIDS
May 26, 2014 at 9:48 pmThis is awesome!
Kristen S
May 27, 2014 at 1:04 pmHad no idea about the binding screw’s secret name. Did Chicagoan’s just really want their own screw? Or maybe they liked screwing so much (womp womp, bad joke)
Jennifer @ Brave New Home
May 27, 2014 at 1:49 pmLooks great and perfect to beacon summer!
Andrea@personallyandrea
May 29, 2014 at 9:17 amOh hey I’m wearing one of those belts right now…what was I thinking? They look way better on your project! Awesome!
Alex
May 30, 2014 at 7:47 amLOL! It is a nice belt. I did buy an extra just to wear. For $3 you can’t go wrong.
ChiWei
May 30, 2014 at 9:07 pmGreat lantern Alex! Now I need to go through and find something to do with leather. I don’t see it around the blogosphere enough and your project is uber creative 🙂
Alex
May 30, 2014 at 9:42 pmThanks ChiWei! I agree. I’ve been trying to use different materials and things that we are a touch different just bc it’s nice to try and see if we can work new materials in diff ways. I’m trying to wean myself off of mason jars too. LOL!
Dani @ lifeovereasy
June 9, 2014 at 1:04 pmWait, how did I miss this? It’s genius. I have already learned so much here, and it’s only just after noon. I can take the rest of the day off. Chicago screws? Who knew. E6000? Lots of my life’s problems are now solved. Seriously I can make myself a nice drink and go nap for the rest of the day.
Sharon Hayes
June 13, 2014 at 11:09 amI just checked and they have the binding screws at Amazon. !00 count in various sizes and at a good prices. This is a great project and I have some old canning jars that used to come in the green glass. They would look great as a hanging lantern.
brepurposed
June 15, 2014 at 9:06 pmHi! I was featured along with you on Apartment Therapy and just had to stop by and say how much I love this! Just finding your blog for the first time and can’t wait to snoop around 🙂
Alex
June 17, 2014 at 3:50 pmHi! Nice to meet you. It’s great to meet a fellow blogger with an affinity to repurposing and Upcycling!
cheryl
March 8, 2015 at 2:05 pmNeat idea, you could also check thrift stores for belts and candles, what is the white stuff that holds the candle? White sand?
Alex
March 8, 2015 at 2:08 pmI believe at the time I shot the photo I used Epsom salts. But yes you can use sand, rocks or anything you’d like.